Tracking for TradeDesk
This guide will show you how to connect your TradeDesk account and pull the following metrics:
- Spend
- Click Tracking
- Attribution
Setting up TradeDesk within Northbeam involves four steps:
Step 1: Retrieve TradeDesk Integration Details
Step 3: Creating a Scheduled Report
Step 4: Enable TradeDesk Integration
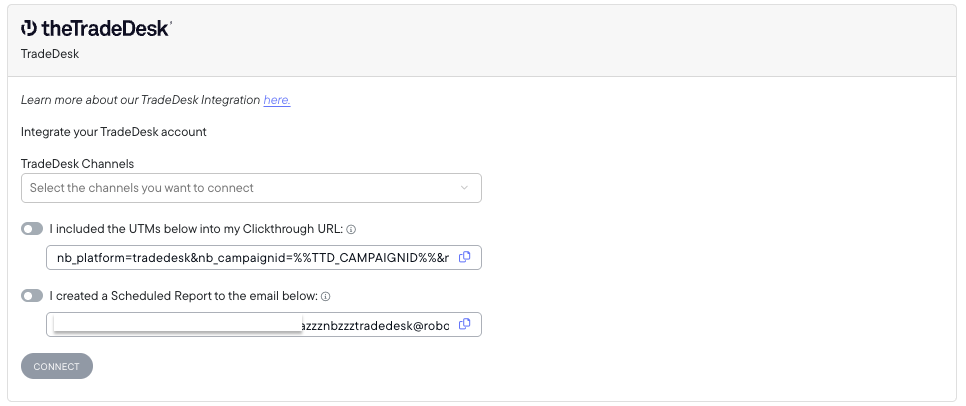
Step 1: Retrieve TradeDesk Integration Details
Retrieve the information needed to set up your integration by navigating to the Connections menu in your dashboard. Follow these steps:
- Go to Settings
- Select Connections
- Scroll down to find TradeDesk
You'll find the following:
- TradeDesk Channels - These are the Tradedesk channels that are available. Keep in mind, any view-only channels are not measurable at the time (Audio, Digital, Out of Home).
- Click UTMs – URLs to be used in Click Tracking.
- Email for Scheduled Report – The email address for sending scheduled reports.
Step 2: Inserting Click UTMs
Step-by-Step Guide
Please Note
Ensure your UTM starts with “&” or “?”.
- If you have existing parameters, use “&”:
- Ex: northbeam.io?utm_source=tradedesk&nb_platform=tradedesk…
- If you do not have existing parameters, use “?”:
- Ex: northbeam.io_?nb_platform=tradedesk…
Step 3: Creating a Scheduled Report
Step-by-Step Guide
Metrics need to be sent daily to our robot email address. In order to send us the data, please create a scheduled CSV.
- Create a TSV/CSV report
- Template Name: northbeam_scheduled_report
- Type: Performance (100 days, All Metrics)
Add the following fields, metrics, and conversions:
Add Fields:

Date
Ad Group
Ad Group ID
Campaign
Campaign ID
Creative
Creative ID
Advertiser Currency Code
Media Type

Add Metrics:

Clicks
Impressions
Advertiser Cost (Adv Currency)
Advertiser Cost (USD)

Add Report Column:
01

Add Conversions:

Click Conversion
Click Conversion Revenue
View Through Conversion
View Through Conversion Revenue
Please configure additional fields:
- Filter by Partner or Advertiser > select your business name
- Date Range: Last 30 Days
- Date Format: Sortable
- Numeric Format: US
- Time Zone: UTC
- File Format: CSV
- Include Headers
- Email this report to the email address in your Connections Page. It should look something like: <your_client_id>zzznbzzztradedesk@robot.northbeam.io
Step 4: Enable TradeDesk Integration
-
Navigate to the Connections menu in Northbeam:
- Go to Settings.
- Select Connections.
- Scroll down to locate TradeDesk.
-
In the Connections menu:
- Select the TradeDesk Channels you're advertising on.
- Note: Attribution may be limited on specific channels.
- Check the boxes to confirm that the following have been set up:
- Click UTMs
- Scheduled Reports
- Click Connect.
- Select the TradeDesk Channels you're advertising on.
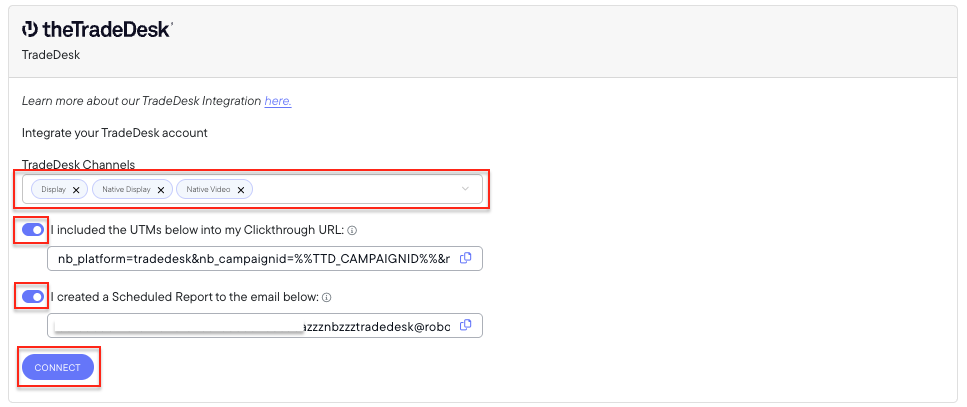
Once enabled, Northbeam will begin reporting spend and click performance during the next data refresh.
TradeDesk View-Based Modeling Update
Supported Channels
Our current TradeDesk supports the following channels on a click-basis:
- Display
- Video
- Native Display
- Native Video
Supported Attribution Models
For these click-based channels, the following attribution models are supported:
- First Touch
- Last Time
- Last Non-Direct Touch
- Linear
- Clicks-Only
Channels with limited attribution
The following channels generally don't lead directly to website clicks and will see minimal tracking and performance data:
- TV
- Digital Out Of Home
- Audio
Unsupported Attribution Models
The above placements are not supported by our view-based attribution models including:
- Clicks + Modeled Views
- Clicks + Deterministic Views
Scheduled reports (Step 3) will continue to function as normal, so you can expect to see spend data pulling in as usual.
Updated 17 days ago